

|
|
|
| | Home | News | Tutorials | Downloads | FAQ | Screenshots | Links | Credits | | |
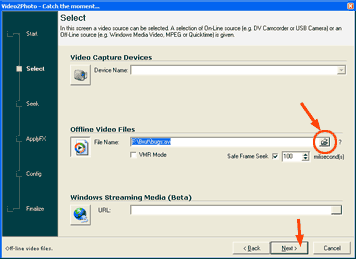
Select Video |
First you need to select your source video file. Click on the small button to browse for the file or edit file name directly in the edit box. After a valid file was selected you can press Next button.
Please Note: Other file types may work but this depends of your DirectShow configuration. |
Select Frames |
After adding your frames to the selection you can edit the frame name (which will appear later in the gallery). To do so, click one time in the tree to select the item and again the same to edit the caption (like you do in Windows Explorer when renaming a file) . When ready with the selections click Next. Please Note: |
Config Web Gallery HTML |
After that select Web Gallery Settings tab and adjust your web gallery settings (e.g. Gallery name, table properties, colors, thumbnail size, etc.) This screen will affect drastically the web gallery output so take care when changing each item. |
Select image file properties |
By selecting 70% you will get a fair size/quality ratio. You may also tune up how the files will be saved on disk. A sample file name is displayed when tuning the filename. Do not forget to have Add Selection Name checkbox checked. This will add your selection name to the file name so you can read the caption directly in the filename. When finished press Next to go to last screen. |
Select Video |
All frames will be processed, the HTML code created and exported into specified folder. The content of that folder can be later copied with your FTP program on the web or changed using an HTML editor (Frontpage, Dreamweaver, etc.)
|
Previewing the Gallery |
|
The Result |
|
|
Video2Photo is FREE. No charge will be taken for using the application. Whatever you do with
Video2Photo you shall take care to not break the copyright clauses when
capturing from various media. The author takes no responsibility for illegal
usage of the Video2Photo software. |
 Select
your desired Frames using the slider bellow the Video window. After
each frame click "Add Frame to Selection" button. The frame will be
added in the Tree (right side of the Video Window) having a default
caption.
Select
your desired Frames using the slider bellow the Video window. After
each frame click "Add Frame to Selection" button. The frame will be
added in the Tree (right side of the Video Window) having a default
caption. In the Config
screen be sure to choose HTML Web Gallery checkbox in the Export
As... Section.
In the Config
screen be sure to choose HTML Web Gallery checkbox in the Export
As... Section. After
setting the Web Gallery look and feel you may need to adjust the
JPEG compression. Take care. 100% means minimal compression therefore
good quality but big file size also.
After
setting the Web Gallery look and feel you may need to adjust the
JPEG compression. Take care. 100% means minimal compression therefore
good quality but big file size also.
 The last
screen gives you the possibility to superimpose a text over each
frame (e.g. copyright). Also here you can specify the output path to
the folder where the gallery will be saved. After tuning everything
you can press Render button.
The last
screen gives you the possibility to superimpose a text over each
frame (e.g. copyright). Also here you can specify the output path to
the folder where the gallery will be saved. After tuning everything
you can press Render button. You can preview
the gallery in your default browser by clicking Yes. Your gallery
was exported in the path displayed in this dialog box.
You can preview
the gallery in your default browser by clicking Yes. Your gallery
was exported in the path displayed in this dialog box.